I was going through cloud servers on Internet, as it becomes very difficult to manage everything on shared hosting.
Amazon AWS is one of the providers of cloud services, which has a scheme of pay as you use. Amazon AWS includes a lot many web servirces like, Api Gateway, SNS(Mobile Messaging), S3(Strorage), etc.
AWS has almost all those reuirements which a developer would require.
And also the best part is Amazon AWS gives 12 months free access to its web services.
In this post we will discuss about creating an Account on Amazon AWS and setting up with cloud on EC2 (a service of amazon aws which provides cloud computing).
Amazon EC2 cloud computing, that includes a public ip and a free domain(domain would be somthing like ec2-bla-bla.bla-bla.amazonaws.com)
Follow these steps to create Amazon Account:-
- Create a amazon AWS account go here https://aws.amazon.com/ on top left click on sign in to console. After doing that you may be asked for billing information. Fill in that becasue it is required to veirfy your account, it charges Rs. 2 (In India) for the account verification.
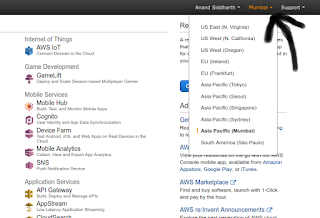
- After completing that you will be dropped into your dashboard. On top right corner you will be seeing your Name and just next to that you will see a dropdown of Server Region. Click on that and change to your desired server location. It is recommened that you choose a location which is nearer to your target customers's location. Like for India select Asia Pacific (Mumbai).
- On top you have black coloured navigation menu from where you can easily navigate to desired service's(dashboard) or docs. From their go to Compute > EC2
- Next you will be able to see your EC2 Dashboard. Here you will be able to see number of instances (i.e. Hosted Clouds), number of volumes (i.e. storage drives), etc. you will get familiar with all of them as soon as you start exploring. Click on launch instance.
- Next you have to choose an Image/OS to begin with I will choose ubuntu for now.
- After that select free tier option which will have 1 Gb Ram 1 cpu. Then click on review and launch. you can review other configurations add storage if you want. Then you continue.
- Next you will get a dialog box where you will be asked to create a key pair. Select create a new key pair add name to it and then click on download. With this key you can access shell of your cloud via ssh. For e.g. ssh -i 'yourkey.pem' ubuntu@ec2-bla-bla-bla-bla.amazonaws.com!
- You are done! setting up your cloud.

Thank you for reading this post, Share if you like it.


Its really great and knowledgeable blog you have shared with us. Keep me more updates in future.
ReplyDeleteCloud Hosting Providers
Cloud Computing SaaS